|
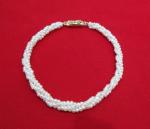
How to Make Ribbon Pearl NecklacesHow to make ribbon pearl necklaces -- instructions here!
Needed supplies:Clasp--single or triple Second clasp if you also want a bracelet Pierced earring wires Ribbon--1/4" sheer Pearls--approximately 7 pearls for a single necklace, 2 for earrings; 21 for triple necklace, 2-4 for earrings; 48 for longer 6 strand necklace, 24 for earrings. Scissors (sharp) Match or lighter Small needle nose pliers Patience View a kit It's not difficult to learn how to make ribbon pearl necklaces. How to Make Ribbon Pearl Necklaces -- Perfect for Bridesmaids The challenge with using real pearls is their small hole. Regular beads have larger holes and a beading needle can easily be used, but pearls require the ribbon itself to be shaped into a point and threaded through without a needle, then pulled all the way through with needle nose pliers. (Small needle nose pliers can be purchased at craft stores.) The point will become frayed and needed to be "sharpened" again every once and awhile. You can also buy pearls with larger holes. This fact makes the process of how to make ribbon pearl necklaces a little more tedious...but still an easy one.
Size of ribbon -- How to make ribbon pearl necklacesAgain, because of the small holes, not all ribbons will go through. For me, the 1/4" "Sheerly Yours" from Offray works best, but other brands work also. (Wider sheer ribbons doesn't go through the holes.) A small roll holds 5 yards of ribbon and isn't too expensive, but it's been difficult to find a variety of colors in this width. I had been thinking these would always be in stock, but find they are now often sold out. I've found these ribbons at Walmart, Michaels, and Hobby Lobby, but I'm sure they're in other stores too.
How to make ribbon pearl necklaces--step by step instructions.I'll be assuming that you'll be making a single necklace and earrings. For triple necklace and bracelet...adjust accordingly.
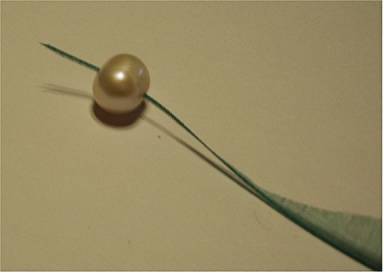
1. Cut a length of ribbon long enough for both the necklace and earrings. You'll cut them apart after the pearls are threaded. (Or, you can leave it on the roll and cut it to length after the pearls are on.) Allow extra ribbon for fraying and tying knots. 2. Trim an end of the ribbon to a very sharp elongated point....long and skinny. Your goal is to get the tip through the pearls enough to grab with your fingers or pliers. (The ribbon has a tiny edge to it. I follow this edge for a little way to make the point.)
3. Put point through pearl hole as far as possible, far enough to grab the point that comes out the other side with your fingers or pliers.
4. Pull ribbon through pearl, using pliers if necessary. This can be frustrating as the ribbon can fray and break, but you'll get the hang of it with practice. That's why extra ribbon must be allowed. Hint: If you have a pearl reamer, you can make the holes in the pearls larger, making it much easier to pull the ribbon through. This will also keep the ribbon in a better condition.
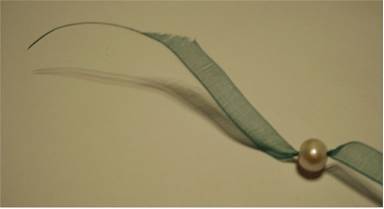
6. Cut ribbon at the desire length, allowing enough ribbon for a knot at each clasp and two on the earrings...one at the wire, one on the end...see photo. 7. Tie a very tight knot and trim ribbon, leaving a small amount that will be melted with a flame. 8. Carefully, with the match or lighter, melt the raw edge of ribbon at each knot. 9. Guess what? You are finished! Almost. 10. Finish any adjusting of pearls and enjoy! 11. Smooth out ribbon which has been smashed after going through the holes. 12. If you're like me, you'll want to make another and another and... These are lovely necklaces for any occasion and are especially nice for bridesmaids as the ribbons come in bright colors. If you enjoyed these instructions for how to make ribbon pearl necklaces, you'll enjoy seeing more photos of them. View a longer 6 strand ribbon pearl necklace. How about a viewing a photo of all needed supplies for these nifty pearl and ribbon necklaces?
|